Why Ironing Acoustic Curtains Requires Special Care
Acoustic curtains are not ordinary drapes. They are engineered with dense, multi-layered fabrics, often incorporating mass-loaded vinyl (MLV) or foam cores to absorb sound. This construction makes them highly effective for noise reduction but also sensitive to heat and pressure. Ironing incorrectly can melt synthetic fibers, crush acoustic layers, or leave permanent shiny marks. The goal is to remove wrinkles without damaging the curtain's sound-dampening properties. This guide will walk you through each step safely.
What You'll Need Before You Start
- A steam iron with adjustable temperature settings (preferably with a Teflon or non-stick soleplate)
- A sturdy ironing board or flat, padded surface
- Distilled water (to prevent mineral buildup in the iron)
- A pressing cloth (100% cotton or muslin) - essential
- A spray bottle with water (optional, for stubborn wrinkles)
- Clean, dry hands or cotton gloves
- A vacuum cleaner with upholstery attachment (to remove dust before ironing)
___PROTECTED_0___
Step-by-Step Guide to Ironing Acoustic Curtains
Step 1: Check the Care Label
Every acoustic curtain should have a sewn-in care label. Look for the ironing symbol: a dot inside the iron indicates temperature (one dot = cool, two dots = medium, three dots = hot). If there is an X over the iron, do not iron—use steaming or professional cleaning instead. Many acoustic curtains are made from polyester or blended fabrics, which require low heat (one dot, max 110°C / 230°F). Never exceed the recommended temperature.
Step 2: Prepare the Ironing Board and Curtain
Set up your ironing board in a well-lit, ventilated area. Lay the curtain panel flat, ensuring it is completely dry. If the curtain is still damp from cleaning, let it air-dry fully—ironing a wet acoustic curtain can damage the acoustic layers. Vacuum the curtain gently to remove any dust or debris that could bake into the fabric during ironing.
Step 3: Set the Correct Iron Temperature
Turn the iron to the lowest heat setting (synthetic or silk setting). Allow the iron to heat up completely. Most acoustic curtains are synthetic, so high heat is dangerous. If your curtain is lined with a separate acoustic layer (e.g., felt or foam), never iron directly on that side—always iron the fabric side.
Step 4: Test on an Inconspicuous Area
Before ironing the visible area, test a small, hidden section—like a bottom hem or inside seam. Place the pressing cloth over the test area and iron for 5–10 seconds. Check for any melting, sticking, or shine. If the fabric reacts poorly, stop immediately and consider steaming instead.
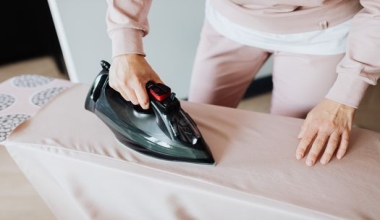
Step 5: Iron the Curtain Panel
Place the pressing cloth over a section of the curtain. Using a gentle, gliding motion, press the iron down without applying excessive pressure. Avoid resting the iron on one spot for more than a few seconds. Work in sections, moving from top to bottom. For large panels, it may be easier to iron from the back side (fabric side only, not the acoustic layer). Re-position the pressing cloth as needed.
Step 6: Handle Stubborn Wrinkles with Steam
If wrinkles persist, use the steam function sparingly. Hold the iron just above the fabric (not touching) and press the steam button to release a burst of steam. Then smooth the area with your hand (wearing a glove) or use a light touch with the iron over the pressing cloth. Alternatively, mist the area with water from a spray bottle before ironing.
Step 7: Allow the Curtain to Cool and Hang
After ironing the entire panel, let it cool completely on a flat surface. Then hang the curtain on the rod immediately to set the smooth finish. If you fold or stack it while warm, new creases may form.
Alternative Methods: Steaming vs. Ironing
| Method | Pros | Cons |
|---|---|---|
| Steaming | No direct contact, less risk of melting; works well for synthetic blends | May not remove deep creases; can add moisture (needs drying time) |
| Ironing (with pressing cloth) | Effective for crisp, flat results; good for stubborn wrinkles | Higher risk of damage if temperature too high; more effort |
For most acoustic curtains, steaming is the safer choice. If you must iron, always use low heat and a pressing cloth. Many users find that hanging the curtain in a steamy bathroom (e.g., after a hot shower) relaxes wrinkles without any tools.
Common Mistakes to Avoid
- Using high heat: Melts synthetic fibers and destroys acoustic properties.
- Ironing without a pressing cloth: Direct contact can cause shiny patches or sticking.
- Ironing the acoustic layer: Foam or felt cannot withstand heat; always iron the face fabric.
- Leaving the iron in one spot: Creates burn marks or warps the fabric.
- Ironing a damp curtain: Moisture plus heat can delaminate the acoustic layers.
- Skipping the test patch: Every batch of fabric may react differently.
How to Maintain Acoustic Curtains Between Ironings
- Hang immediately after washing or cleaning to minimize wrinkles.
- Use a fabric-safe wrinkle releaser spray (test first) for light creases.
- Avoid overloading the curtain rod; crowded fabrics crease more.
- Regularly dust or vacuum to prevent dirt from embedding in the fibers.
- Rotate curtains if they are exposed to sunlight, as UV can stiffen fabrics.
Frequently Asked Questions
Can I use a garment steamer on acoustic curtains?
Yes, a handheld or standing steamer is often ideal. Hold the steamer head a few inches away and work in vertical strokes. Ensure the curtain is dry after steaming to prevent mold in the acoustic layers.
What if my curtain has a separate blackout lining?
Blackout linings often contain coated layers. Do not iron the coating. Iron the curtain from the back (non-coated side) or use a pressing cloth. Better yet, steam the lining instead.
My acoustic curtain is heavily wrinkled after washing. What should I do?
If it's machine-washable (check label), toss it in the dryer on the no-heat air-fluff cycle with a damp towel for 15 minutes. Then hang immediately. If wrinkles remain, follow the ironing steps above.
How often should I iron acoustic curtains?
Only when necessary—after washing or if they become creased from storage. Frequent ironing may wear down the fabric. Opt for steaming or hanging in a steamy room for regular touch-ups.